
I've been using The Happy Planner for almost a year now and I love it! It wasn't until recently that I discovered the amazing world on planner stickers!

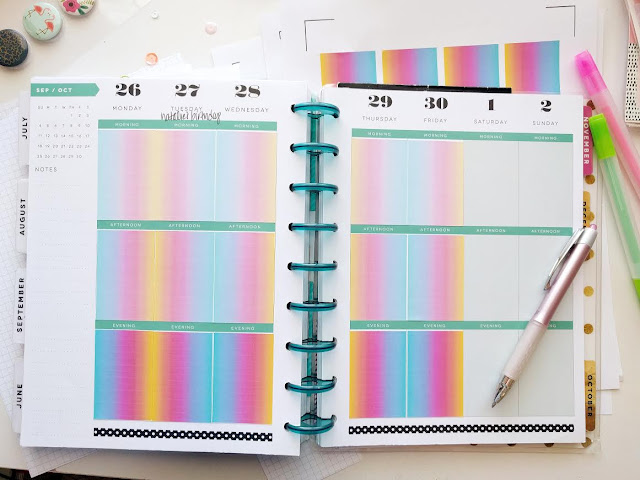

I finally got some sticker paper to try them out, and it's safe to say, I'm addicted.
After spending the morning in Illustrator, and a couple YouTube videos later...I made some of my own.

Here they are in action. I positioned the stickers back to back, increasing in intensity, but there are a ton of different ways you could pattern them.

I'm really excited about making more planner stickers, for myself and for everyone else. If you are looking for any specific kind of stickers, let me know in the comments.
Don't forget to follow me my Planner Pinterest board for more great printables.
XOXO,


Yesterday I posted this picture on my Instagram and asked for your help to pick my color scheme for this scrapbook page. It was SO fun! The response was unanimous in favor of neon pink, black and gold. I worked on it last night and I'm excited to share how it turned out today.

Thoughts?
I like the way it turned out. I wish I wouldn't have sprayed the background with the gold mist, but I didn't have any more card stock in that color so I had to roll with it. The neon papers came in a 6x6 pad I got at Target years ago. I've been holding onto them without a purpose for a long time.
That's one of my favorite parts about having a scrapbook stash, I'm always finding old things but they feel new. The other bits are from various kits and sale items I've collected over the years.
My favorite part is the alphas. They are mistable Heidi Swapp alphas. I used black ink to fill them in and then traced the edges with a gold marker to help them standout against the background. The marque style was perfect for the title and theme of her singing troupe performance.

To make sure you don't miss out on the next round of #choosethecolors, follow me on Instagram.
XOXO,

After our weekend away to New Orleans, LA, we had just a few short days back in Texas before we headed out on our big summer vacay in Utah. We generally visit either Utah or California and sometimes both during the summers, because that's where our families live.
But now since we were moving to California, Utah was the first stop this summer. We celebrated so many big milestones and made memories every minute. It was one of the best summers I have ever had.

After our 3 weeks in Utah, we headed back to Texas for a few short days. Just long enough to let the packers and movers collect our belongings and say a few good-byes. One of the best parts of our faith, is the worldwide connections. In every place we have lived, we have known somebody. Or somebody who knows somebody we know. It's like the 5 degrees of Kevin Bacon, but usually less than five to find a connection.
The tears didn't really hit until a few days after we arrived in California. I did love Texas. Not all of it, but so much of it. But like every place we leave, it's the people we miss the most.
I'm grateful to be finally settling in. I'm still currently swimming in brown paper and boxes. Slowly but surely, the house is coming together and I'm getting my craft room back in order. I'm excited for this next chapter in our lives. Stick around to see fun new things coming!
XOXO,


We spent a wonderful weekend away, visiting some old friends down in New Orleans, LA. The city is about halfway for both of our families. Although we finally live back within driving distance, we haven't gotten together over the last 2 years. Nothing like an impending move to motivate you to make plans!
You know it's a good trip when you only took a handful of photos. I meant to take more, I really did, but we were having such a great time chatting and exploring that I didn't even really think about the pictures.

A few highlights....
Cafe Du Monde - Delicious beignets, they are like dense sopapillas. We went to the original location in Jackson Square, and walked several blocks to get there. We found out after there were other locations closer to us, which would have been easier on our feet.
Cochon - Awesome Cajun dinner spot. We were all starving and this was close to our hotel. It turned out to be one of the best meals we ate there. If you go, you MUST get the macaroni & cheese, it was beyond amazing. We also tried the chicken & andouille gumbo, cochon, lima beans, rabbit & dumplings, lemon poppy-seed cake and blueberry crumble.
Audubon Aquarium - We have been to many an aquarium. Monterey Bay Aquarium is a long-standing favorite and the Audubon Aquarium definitely held up to our expectations. It has seahorses, jellyfish, a shark tank (including a walkthrough tunnel), and penguins. It also has a touch pool where we got to touch manna rays. Definitely a highlight. Plus, it's indoor and air conditioned, a perfect place to escape the summer heat.
We did do a quick trip through Bourbon Street and the French Quarter, but it's not a family friendly area of town, so we made it a quick trip through that area.
Weekend trips seem to fit our family lifestyle the best. We are homebodies by nature and too many days away from home makes us kind of itchy. Since we will be moving back the the west coast, we are already thinking of our next destination.
Here is what we have come up with so far....
Yosemite National Park
Redwoods National Forest
Mt. Shasta
Oregon Coast
Catalina Island
Santa Barbara
Any other suggestions? I would love to visit/eat/stay at already approved places.
XOXO,


Let's be honest, stars and hearts never really go out of style in the scrapbooking world. Maybe that's why my stash is full of them!
This page is full of all kinds of bits and baubles from kits and collecting over the years. The sunburst journaling tag is an ancient Studio Calico find, that was hiding in a long forgotten box. When I use things old supplies like that, it justifies to my former self who thought, "I'll need that one of these days." High-Five Me!
The curved lines were so fun on this paper, I knew I wanted to incorporate them into my design. It worked out perfectly for the text string. Trimming the vellum to the perfect curve took a little more time, but in the end I think it was worth it. I stitched along the top to hold it in place.

As Zoe is bridging the world from little girl to girl, my role in her life is also changing. I'm trying to let go, while still letting her know I'm always around. It's a delicate balance. It's hard to let go when she is my whole world. Having only one child is a double edged sword sometimes. She has me all to herself, but then again, she has me all to herself. For now she still lets me decide most everything, but I have a feeling those days are sooner coming to an end.
It's these tender times that make me want to document every day, and every feeling. I love looking back at these moments and being able to see how much has changed, and how much has stayed the same.
XOXO,


Another Day, another quilt. Well, not really. I actually finished this fun quilt a few weeks ago, but I just barely got a chance to take pictures of it. Like most of my project, I've had this fabric for years and have just now gotten around to turning it into something.
Something about moving always motivates me to finish my works in progress projects. Thankfully the only piece that I needed to buy to finish it was the backing. This line was made in cotton and flannel. Generally, I only stick to cotton backings, but I splurged for some cozy flannel.

I didn't use a pattern for this quilt. I just cut as many hexagons as I could from the fabric that I bought. I still have lots more hexagons left - which will someday by turning into another quilt. To make sewing the hexagons easier, I used half hexagons. I used my Hex N' More Ruler by Jaybird Quilts. Worth every penny. It fits perfectly on 1/8 yard cuts.
I quilted in an all over swirl pattern with orange thread. I wanted it to blend into the orange flannel backing. I ventured away from a lot of my standards on this quilt, but it sure is fun to look at.
I love stripe bindings. If you look at most of my quilts, I try to use some kind of striped binding. Stripes are my favorite pattern (just look at my closet) and they always seem to make the best bindings.

It's a pretty good size quilt. I haven't measured it yet but it's probably 70 x 80ish. It doesn't have a home yet, but it's awaiting a purpose, beautifully rolled up until I find one for it.

XOXO,

It's true. I posted this photo on Instagram and Facebook a few weeks ago, but I wanted to share some more details about our upcoming move.
We will be leaving Texas about 1 week shy of our 2 year anniversary in Ft. Worth. Yes, we've crazy. No, I'm not looking forward to moving again. Yes, we will miss it here. Just before Thanksgiving we also moved for our apartment to a house. Texas has brought a lot of firsts for us, and it will always hold a special place in my heart.
We will living in Palmdale, CA, which is outside of Los Angeles, past Burbank, and about 2 hours from Las Vegas. It's high-desert, which means it's still hot ( I just can't catch a break with these hot climates)
We are going to be so much closer to both our families, which makes us and them, very happy. Currently, plane rides are required to visit family, which means they only happen once or twice a year. I'm excited to be able to spend holidays and long weekends together. We are excited to explore the LA area and make our first trip to Disneyland.
If you have any suggestions of things to do or places to explore, particularly outside, we would love to hear about them!
XOXO,

Scrapbook tools are one of my favorite purchases for scrapbooking on a budget. They usually save time and money, overall allowing for more options then their pre-made counterparts. Enter the Photo Sleeve Fuse by We R Memory Keepers.
When I first saw this tool, I thought it was kind of a gimmick until I was putting away some of Zoe's school projects. I generally shove all the projects she makes in the school year into a 12x12 page protector. At the end of the year, I go through, pick my favorites and then slide them into their own page protector.

This year as I've been going through her projects, I found oddly shaped papers that require a custom page protector. If I use a 12x12 it's too big and an 8.5x11 is too small. That's when I really had a desire to try the Fuse tool.
The best parts: You can make custom size page protectors, perfect for odd size memorabilia (like the pressed penny and souvenir photo). I love that I don't have to buy pocket pages anymore. It's compact and easy to store. I like the permanency of it - I hate things falling out of page protectors.
The worst parts: It can be temperamental. There is a learning curve on how to get good line and not accidentally press too hard. There is no temperature control either.
Overall Feeling: Worth it for what I need it for. I don't think this is a must have, but it helped me achieve my desired effect. I'm glad I purchased it.

Have you tried it?
XOXO,

When I first saw this tool, I thought it was kind of a gimmick until I was putting away some of Zoe's school projects. I generally shove all the projects she makes in the school year into a 12x12 page protector. At the end of the year, I go through, pick my favorites and then slide them into their own page protector.

This year as I've been going through her projects, I found oddly shaped papers that require a custom page protector. If I use a 12x12 it's too big and an 8.5x11 is too small. That's when I really had a desire to try the Fuse tool.
The best parts: You can make custom size page protectors, perfect for odd size memorabilia (like the pressed penny and souvenir photo). I love that I don't have to buy pocket pages anymore. It's compact and easy to store. I like the permanency of it - I hate things falling out of page protectors.
The worst parts: It can be temperamental. There is a learning curve on how to get good line and not accidentally press too hard. There is no temperature control either.
Overall Feeling: Worth it for what I need it for. I don't think this is a must have, but it helped me achieve my desired effect. I'm glad I purchased it.

Have you tried it?
XOXO,

Pink Lemonade Party Banner | Fort Worth Fabric Studio
By Holly - 5/05/2016 10:00:00 PM
If you are not familiar with Fort Worth Fabric Studio, you should be! Jodie is the kindest and sweetest person you could ever hope to work with. She prides herself on customer service and has lightening fast shipping.
Every Friday, Jodie releases a new bundle for sale. These bundles are limited in quantities, so if you fall in love, jump on it fast. Recently, each Friday bundle has come with a project idea or tutorial. Jodie asked me to help for this week, and I couldn't have loved the bundle more. It's girly and fresh, perfect for the upcoming summer months.
This week's bundle is Pink Lemonade.


Today, I have the tutorial for the party banner. It is also perfect for decorating a girl's room or a birthday party. I still have some leftover fabric to blend into my stash or make something else, maybe a table runner.

Supplies:
- Pink Lemonade Fat Quarter Bundle
- Rotary Cutter & Mat
- Ruler
- Sewing Machine
- Pinking Shears (optional)
Start by ironing your fat quarters. Cut 2.5"x WOF strips from each fabric.

Make bias tape from strips by sewing diagonally along matched up corners of each strip. I use a bias tape maker to fold the fabric while I iron it. You can also fold and iron by hand.

Cut 6.5"xWOF strips from all fat quarters. Using a ruler, cut 6.5" tall triangles from strips.


Fold the bias tape length in half, mark. Fold a triangle in half, mark.


Match edges of the next triangle. Place clover clips on outside. Repeat with 7 triangles on each side of the center triangle. This will assure the banner is balanced.

Sew the bias tape closed, securing all the triangles.

Enjoy!
The total length is about 4 yards. This project can be completed in an afternoon. Think of all the possible fabric combinations! I'm very excited to make alternate versions of this project.


XOXO,


We were able to snap some pictures of Zoe in the bluebonnets in between rain showers last weekend. They are intermittently spread out all over the sides of the roads and really inconvenient picture taking areas. Thankfully, we found a small field tucked behind the golf course with a nice sized patch of them.
Lately, I've been almost nostalgic about Texas. We have been here almost 2 years and I'm growing to love it. This spring has been full of amazing thunderstorms, beautiful scenery and warm, breezy nights. It will get hot soon, at which time I will remain sequestered in my air conditioned home, or parked at the pool...but for now I'm loving it here.

Life is so good.

XOXO,

Seriously, what girl doesn't need a dinosaur dress?

This whimsical creation came about because I needed to try out a pattern for Zoe's baptism dress. The pattern called for 2 yards of fabric. I started digging through my stash and found this fabric. I had planned on using it for some pajamas, but quickly changed my mind.
Does the fabric match the feel of the pattern? Not really, but I think that's what I love about it.

It's long and flowy with puff sleeves. It is far from perfect but Zoe was so excited when I showed it to her.
The pattern is from this book. It comes with a CD to print off all the patterns, which I love because I can use one pattern and make many different sizes. Zoe grows so fast that I buy digital patterns if possible, so I can use them more than once. The fabric is Dino Exhibit by Lizzy House for her Natural History collection. I purchased mine at Stash Fabrics. There are still a few yards in stock.

I am extremely proud of the buttons. I have tried multiple times to make button holes on my machine and it never quite works out, but I managed to finally conquer that skill with this dress.

Ultimately, I figured out that the bodice and skirt will work for the baptism dress. I will be changing the sleeves and lowering the neckline a bit, but I'm glad to know that the overall dress will fit her. I didn't want to start cutting into my wedding dress without knowing if the final version would work.
Look for the final version in the coming weeks, cutting starts today!
XOXO,


